Sakai Admin Guide - Full
- Former user (Deleted)
- Wilma Hodges
- Former user (Deleted)
Sakai 2.x Administrator's Guide
This is a single-page version of the Sakai 2.x Administrator's guide, which is intended to be more useful for printing and exporting the document in PDF format. To export in PDF format, click the PDF icon (![]() ) that appears in the top right side of each Confluence page.
) that appears in the top right side of each Confluence page.
You can also view the guide in sections.
Introduction
This document covers the basics involved in moving from limited exploration of Sakai to something that can be used reliably by a larger group of users. The document will take as a given a working Sakai installation that uses the out of the box defaults.
This document assumes you have already been able to successfully install Sakai. It is also recommended that you take a moment to familiarize yourself with using the application before exploring the topics in this guide.
If you get stuck during the installation or configuration process, please start by searching this site and/or an archive of the sakai-dev list (such as gmane). If all else fails, join the Sakai developer list (sakai-dev) or the Sakai production list (production) and ask for help. For more information, see the "Joining the Community" section of this document.
The sakai.properties file
As mentioned in other areas, the sakai.properties file is a central configuration file that is typically stored in a sakai subdirectory relative to the tomcat home directory ([here are details on changing the default location]). All settings in the sakai.properties file are only read on startup, thus any changes you make will only take effect when you restart tomcat.
The sakai.properties file is a non-XML text file containing a series of key/value pairs that can be read using the load method of java.util.properties.
The first type of simple property (used to set booleans, simple strings, integers, etc.) is set simply by separating a key from a value with an equal sign, along the lines of:
sampleboolean=truesamplestring=set to a string value with one or more spaces, ending in a new line |
Sakai makes use of hierarchical lists of property values, which require that you specify a "count" variable indicating the total number of values. The values themselves are defined by appending a number after each instance of the key. Here's an example:
sampleproperty.count=3sampleproperty.1=peassampleproperty.2=porridgesampleproperty.3=hot |
Configuring the sakai.properties file
An option set in the sakai.properties file is only meaningful if one or more sections of the Sakai code base read and make use of the option and its configured value. There are at present over 250 configuration options used by portions of the Sakai 2.4 code base.
To assist users in setting the most important of the options, an example sakai.properties file is included with the Sakai source, in the directory reference/docs relative to the root of the source directory. The demo and binary distributions are distributed with a basic sakai.properties file as well, which should be stored in the sakai directory relative to the tomcat install included with the distribution.
Starting with this file, it is most critical to review and edit the following settings:
These and other configuration settings are mentioned throughout the remainder of this document. For a full glossary of available configuration options, consult the Sakai Properties Reference.
The Configuration Viewer tool
There is an optional tool available to provide a detailed guide to the sakai.properties file. For more information, visit the Config Viewer Tool home page.
This tool includes a complete list of known sakai properties, which you can download independently of the tool and open using Excel or any spreadsheet program that can open tab-delimited text files. The latest version of the sakai properties data can be found here:
Branding and Identity
sakai.properties settings
There are a number of configuration options found in the sakai.properties file that control branding and identity. These settings are responsible not only for changing the cosmetic wording that end users see in the web interface, but also for customizing information found in logs and email messages.
Setting | Description |
|---|---|
ui.institution | The name of the organization associated with this Sakai installation (such as "My University"). |
ui.service | The local brand for Sakai within the institution. Among other things, this text is displayed at the root of the bread crumb bar that appears within Sakai. |
serverId | A unique identifier for the particular server Sakai is running on. This is used to distinguish nodes in a clustered environment from one another. |
serverUrl | The full service URL for this installation of Sakai |
serverName | The server name for this installation of Sakai (this should match the value for serverUrl). |
skin.repo | The location in which skins for this site are housed. This can be set to a relative or absolute URL. The default is /library/skin, which includes the default skins bundled with Sakai. |
skin.default | The default skin to use for all sites. This should be the name of a skin directory that exists in the skin home directory. |
Skinning
To further change the look of a Sakai installation, it is possible to "reskin" the installation using a series of style sheets and/or updated graphics, which are typically stored in TOMCAT_HOME/webapps/library/skin. For more information about skinning your Sakai installation, visit the "Reskinning Sakai" section of the Sakaipedia. A guide is also available.
Binary Content and Filesystem Settings
Binary content (files) uploaded into Sakai can either be stored in the database itself, or on the filesystem. By default, binary content is stored in the database.
Storing binary content on the filesystem
To use the filesystem to store binary content, add properties like the following to your sakai.properties file:
bodyPath@org.sakaiproject.content.api.ContentHostingService=/content/sakai# Only uncomment the bodyVolumes property if you have multiple content volumes# (sub directories/ mount points relative to the location specified above)bodyVolumes@org.sakaiproject.content.api.ContentHostingService=vol1,vol2,vol3# uncomment the next line if you wish to set a site quota of 1Gb# siteQuota@org.sakaiproject.content.api.ContentHostingService=1048576 |
Note that Sakai only balances content between active volumes. Sakai doesn't check the availabilty of disk space on each volume. So, for example, if you have a single volume containing 100Mb of filesystem content and add four additional volumes, when another 400Mb of files are added, the distribution is likely to be something like 180Mb on the first volume and 80Mb on each of the new volumes.
Body volumes should not include spaces
Warning: If you are using filesystem storage, you should be very careful not to include spaces before or after the commas in your bodyVolumes@org.sakaiproject.content.api.ContentHostingService. This will cause your volume to be created with spaces in their names, which can cause problems. For more information, see:
Setting at least one body volume
Note: If you are using filesystem storage, you should set at least one volume by adding a bodyVolumes@org.sakaiproject.content.api.ContentHostingService option (see above). This will give you room to expand and relocate your filesystem content as your Sakai installation grows. If you do not set this option, binary content will be stored in the root of the directory specified in bodyPath@org.sakaiproject.content.api.ContentHostingService.
Storing binary content in the database
To use the database to store binary content, comment out the directives mentioned above in your sakai.properties file. Any content already located on the filesystem will remain on the filesystem.
Migrating from database storage to filesystem storage
If you have previously stored your binary content in the database and would like to move that content to the filesystem, add the following directive to your sakai.properties file and restart:
convertToFile@org.sakaiproject.content.api.ContentHostingService=true |
There is currently no conversion route to move from storing content on the filesystem to storing content in the database.
Antivirus Scanning
The Rsmart group has developed a wrapper for content hosting that uses ClamAV to scan incoming binary content before it is stored. Source code can be found at:
Database Configuration and Tuning
By default, all distributions of Sakai are configured to use an in-memory version of HSQL db, which is adequate for very basic testing, but does not offer the same reliability and scalability as a more robust relational database. Many developers and the vast majority of Sakai installations choose to use either MySQL or Oracle in production. The reference sakai.properties files include example configurations for Oracle and MySQL. Rather than copying and pasting this code, you should comment out the database configurations you aren't using, and then uncomment and modify the settings appropriate for your database.
Here is a sample configuration block for Oracle:
# Oracle settings - make sure to alter as appropriatevendor@org.sakaiproject.db.api.SqlService=oracledriverClassName@javax.sql.BaseDataSource=oracle.jdbc.driver.OracleDriverhibernate.dialect=org.hibernate.dialect.Oracle9Dialecturl@javax.sql.BaseDataSource=jdbc:oracle:thin:@your.oracle.dns:1521:SIDvalidationQuery@javax.sql.BaseDataSource=select 1 from DUALdefaultTransactionIsolationString@javax.sql.BaseDataSource=TRANSACTION_READ_COMMITTED |
Here is a sample configuration block for MySQL:
# MySQL settings - make sure to alter as appropriatevendor@org.sakaiproject.db.api.SqlService=mysqldriverClassName@javax.sql.BaseDataSource=com.mysql.jdbc.Driverhibernate.dialect=org.hibernate.dialect.MySQL5InnoDBDialecturl@javax.sql.BaseDataSource=jdbc:mysql://127.0.0.1:3306/sakai?useUnicode=true&characterEncoding=UTF-8validationQuery@javax.sql.BaseDataSource=show variables like 'version'defaultTransactionIsolationString@javax.sql.BaseDataSource=TRANSACTION_READ_COMMITTED |
It's possible that for older versions of Mysql, you may have a different dialect like MySQLInnoDBDialect, but this was tested successfully on MySQL versions 5.5.x.
When using this block or uncommenting an existing block, you will need to modify the connection settings specified by the setting url@javax.sql.BaseDataSource at the very least. In addition, you'll need to set the username and password options whichever database you choose, as in:
username@javax.sql.BaseDataSource=sakaipassword@javax.sql.BaseDataSource=******** |
Configuring for Performance
Larger institutions have found the database to be the bottleneck when it comes to Sakai performance. Setting additional database configuration settings may be worth considering (see below for tips for Oracle and MySQL).
Oracle
Oracle may have performance problems with some of the SQL settings that work for HSQL and MySQL. Sakai installations using Oracle should strongly consider the following settings in sakai.properties to avoid these problems:
# For improved Oracle performance (from the University of Michigan)
validationQuery@javax.sql.BaseDataSource=
defaultTransactionIsolationString@javax.sql.BaseDataSource=
testOnBorrow@javax.sql.BaseDataSource=false
These settings will reduce the DB load by not forcing these settings with each use or transaction.
Oracle and Tests & Quizzes
If you're running Oracle and using the Tests&Quizzes tool you should check the datatype of the MEDIA column in the SAM_MEDIA_T table. Hibernate tries to choose the right data type for a field, but has a habit of choosing the wrong one for Oracle. The correct types for each database are:
HSQL: varbinary
MySQL: longblob
Oracle: blob
If you need to change this type for your database, this will also involve finding the primary key constraint, dropping it and then recreating it. Contact your local DBA for further information on making this change. Below is some sample Oracle SQLplus output to better illustrate (SYS_C0064435 is the example constraint; replace it with yours):
SQL> alter table SAM_MEDIA_T modify MEDIA BLOB;

Table altered.

SQL> select constraint_name from user_constraints where table_name='SAM_MEDIA_T'
and CONSTRAINT_TYPE='P';

CONSTRAINT_NAME
------------------------------
SYS_C0064435

SQL> alter table sam_media_t drop constraint SYS_C0064435;

Table altered.

SQL> alter table SAM_MEDIA_T add constraint SYS_C0064435 primary key (MEDIAID);

Table altered.

SQL> desc SAM_MEDIA_T;

[table with BLOB type]

SQL> select constraint_name from user_constraints where table_name='SAM_MEDIA_T'
and CONSTRAINT_TYPE='P';

CONSTRAINT_NAME
------------------------------
SYS_C0064435

SQL> commit;

Commit complete.
MySQL
Case Sensitivity
By default, table names in MySQL are case insensitive on Windows, and case sensitive on UNIX systems. Portions of Sakai that attempt to access tables directly may specify table names in all uppercase or lowercase, which may cause problems if the name specified in the query does not correspond exactly to the name of the table. The solution to this problem (other than waiting for code to be cleaned up) is to configure MySQL to think of table names as being case insensitive. This can be accomplished by editing /etc/my.cnf and adding the following:
lower_case_table_names=1 |
Note If you already are running at standard unix mode 0, you have to convert all of your database and table names to lowercase first as per the notice in the guide before you can switch to one. These statements worked for me to convert all of the tables in one database. Insert your database name that you want to convert here. You could probably do all tables in all databases by just getting rid of the where clause. You also need to rename databases (with the RENAME DATABASE) command if the contain upper case characters.
select concat('rename table ', table_schema, '.', table_name, ' to ' , table_schema,'.', lower(table_name) , ';') from information_schema.tables where table_schema = 'databasetoconvert' INTO OUTFILE '/tmp/dbconversion.txt';source /tmp/dbconversion.txt |
Query Caching
MySQL performance can be considerably improved by caching queries. You can do this by editing your sakai.properties file and altering the connection string as below, all on one line.
url@javax.sql.BaseDataSource=jdbc:mysql://localhost:3306/sakai?useUnicode=true&characterEncoding=UTF-8
&useServerPrepStmts=false&cachePrepStmts=true&prepStmtCacheSize=4096&prepStmtCacheSqlLimit=4096
The parameter that enables use of the query cache is 'useServerPrepStmts=false', while the others (cachePrepStmts=true, prepStmtCacheSize=4096, and prepStmtCacheSqlLimit=4096) enable caching of prepared statements on the server side. Based on production experience at UniSA, a query cache size of 128M is recommended. The query cache size is typically configured on UNIX systems by editing /etc/my.cnf to like this:
[mysqld]
query_cache_size = 128M
You will need to restart your instance of mysql after making the change.
There are some other settable properties for the query cache, but there doesn't seem to be a need to change the defaults. To learn more, you can visit:
- http://dev.mysql.com/doc/refman/4.1/en/query-cache-configuration.html
- http://dev.mysql.com/doc/refman/4.1/en/connector-j-reference-configuration-properties.html
SAKAI_PRESENCE as an in-memory table
Running SAKAI_PRESENCE as an in-memory table can have a significant positive effect on performance for MySQL. The SQL necessary to convert is just:
DROP TABLE SAKAI_PRESENCE;

CREATE TABLE `SAKAI_PRESENCE` (
`SESSION_ID` varchar(36) default NULL,
`LOCATION_ID` varchar(255) default NULL,
KEY `SAKAI_PRESENCE_SESSION_INDEX` (`SESSION_ID`),
KEY `SAKAI_PRESENCE_LOCATION_INDEX` (`LOCATION_ID`)
) ENGINE=MEMORY DEFAULT CHARSET=utf8;
But be sure to run this at a quiet time as otherwise you'd be sure to generate some odd results for users.
Disk I/O issues on Linux (Suse Linux Enterprise Server 9/Red Hat Enterprise Linux 4)
A Linux database server may see big disk-hanging delays (especially if the DB and the web server are on the same machine) under load. This appears to be a side effect of the default SLES9 I/O scheduler, CFQ. The Deadline scheduler, which has a maximum latency for serving requests, is therefore a better choice for database operations - although pages may still render slowly under load, performance will degrade more gracefully, avoiding hangs, and will provide some feedback to users.
To switch to the Deadline scheduler, the boot parameter elevator=deadline must be passed to the kernel that's being used. You can do so by editing the /etc/grub.conf file and adding the parameter to the kernel that's being used:
title Red Hat Enterprise Linux AS (2.4.21-32.0.1.ELhugemem)
root (hd0,0)
kernel /vmlinuz-2.4.21-32.0.1.ELhugemem ro root=/dev/sda2 elevator=deadline reboot=warm
initrd /initrd-2.4.21-32.0.1.ELhugemem.img
You will need to reboot the system to activate the new scheduler.
For more information about these Database issues, refer to the following:
Email Configuration
Out of the box, Sakai uses incoming mail to receive content that will be viewed using the Mail Archive tool, and to receive delivery failure notifications for outgoing messages. Outgoing mail is used for notification purposes, bug reporting, and to deliver content received by the Mail Archive tool.
You need to change a handful of settings within and outside of sakai to get mail working. Most of the changes are in sakai.properties, and will require you to stop Sakai, remove the sakai-mailarchive-james directory under webapps (but leave sakai-mailarchive-james.war), and then start Sakai again.
Outgoing Mail
For outgoing mail, you'll also need to set smtp.dns.1 and smtp.dns.2 to your DNS servers, and to set smtp@org.sakaiproject.email.api.EmailService to a host that handles SMTP in your environment. James can also handle outgoing mail for Sakai, but that this should only be used for small scale installations, as James will not provide the same level of robustness as a dedicated mail server. In particular, James will not handle delivery failures nicely, which makes it unsuited for a real deployment.
You'll probably also want to set setup.request so that informational messages either appear to come from a meaningful address (such as helpdesk@your.institution) or to clearly not come from a usable address (such as noreply@your.sakai.hostname).
You can make all the changes at once, but you'll need to stop sakai, remove webapps/sakai-mailarchive-james/, and then start sakai again each time you want for changes to take effect in james.
Testing Outgoing Mail Using a Notification
The simplest way to test outgoing mail is to add a guest user to a site and enable notification:
- Log in to Sakai as an administrator (or at least a site maintainer)
- Navigate to a worksite
- Open the "Site Info" tool
- Click the "Add Participants" Link
- Enter a valid email address that you have the ability to check under the "Guest(s) Email Address" heading (the lower text area), then click "Continue"
- Select a site role (usually "access" or "maintain"), then click "Continue"
- Tick the "Send Now" radio button and hit "Continue"
- Click "Finish"
A mail message should have been sent to the email address you entered for the guest account.
Incoming Mail
To receive mail, you need to set smtp.enabled to true. You'll also need to set serverName to the service name of your installation (as in sakai.your.institution), so that James knows what messages it should field. You should also set serverId to the real hostname of the individual machine (or at least the unique part of it).
If you don't already have a mail transport agent (ala sendmail or postfix) and can bind to port 25, you should change smtp.port to 25. If you already have a mail agent, you'll need to find some way to move the appropriate mail from port 25 to 8025 (where james lives). You can use a NAT rule, or can configure sendmail or postfix to do the forwarding for you:
Sendmail Integration Instructions: http://bugs.sakaiproject.org/confluence/display/ENC/Sendmail+integration
Postfix Integration Instructions: http://article.gmane.org/gmane.comp.cms.sakai.devel/6139/
Postfix Integration Instructions Alternate: Postfix Email Configuration
Exim Integration Instructions: Exim Configuration
The following is a sample section of sakai.properties including all of the above changes:
# enable Jamessmtp.enabled=true# configuring the port on which James listens. In this example, another component (NAT rules, Sendmail) forward from 25 to 8025smtp.port=8025# James will only accept messages for this hostnameserverName=service.my.edu# You'll get more meaningful feedback if you have the node name configuredserverID=node.my.edu |
You can make these changes all at once, but you'll need to stop sakai, remove webapps/sakai-mailarchive-james/, and then start sakai again each time you want for changes to take effect in james.
Testing Incoming (and outgoing) Mail Using James
Once you get all that done and start Sakai, you should be able to test the your configuration as follows:
- make sure James is listening on the right port
telnet {the value you usedforserverName}8025[or25ifyou've set it to that]- you should see a status message from the server indicating the server name and the MTA. The server name should match what you put in for serverId (plus a domain), and should be followed by something like
(James SMTP Server2.1.3) ready {date and time}
- Set up a site for testing the mail archive tool
- Create a new site that includes the mailarchive tool.
- Open the mailarchive tool in the new site. You should see the value of serverName as configured in sakai.properties.
- Change the options for the mailarchive tool to accept mail from anyone (this makes it easier to test things).
- Enroll a user in the test site with an email address you can monitor. Once this is done, you should get a copy of your test messages.
- Test James from the command line using telnet
- Connect to James using the port you set up above and a command like the following:
telnet {your hostname, or localhost}8025 - Now type:
EHLO {your service name, ala sakai.your.institution) - You should see a response like:
250{serverID.domain} Hello {serverName} (localhost [127.0.0.1]) - Now type:and hit enter.
MAIL FROM:<{your.email@your.institution}> - You should see a receipt like:
250Sender <{your.email@your.institution}> OK - Now type:and hit enter.
RCPT TO:<{the email address you enteredforthe mailarchive tool in your site}> - You should see a receipt like:
250Recipient <{email addressforthe mailarchive tool in your site} OK - Now type:and hit enter.
DATA - Now type:(or something like that) and hit enter twice.
Subject: test... - Now type the body of your message as in:When you're done entering the body of the message, hit enter twice.
This is a message I am using to test James. - Now hit enter, enter a single period, then hit enter.
- You should see a receipt like:
250Message received - Now type:and hit enter.
QUIT - Check the mailarchive tool to see if your message made it in.
- If that doesn't work, go back and check your settings. The log files logs/catalina.out and sakai/logs/james-DATE may help figure out what's wrong.
- Connect to James using the port you set up above and a command like the following:
- If you have a separate mail transport agent (i.e. sendmail or postfix), try the same steps as above, but with the port for the MTA (25) instead of James.
- Check to see that you've received a copy of the messages. If you haven't, check the logs and look for details in the returned message that will eventually be sent to the MAIL FROM: address you entered.
Delivery Failure Notifications
If you wish to receive delivery failure notifications, abuse notifications, etc. for mail sent from your Sakai installation, you should make sure that postmaster@{your service name} is a working email address. It is also advisable to set meaningful email addresses for the postmaster and admin users included with Sakai. If you are using James as a standalone mail server or forwarding all mail for your service host name to James, you may wish to configure an instance of the Email Archive tool to receive, display, and forward all mail for postmaster. By default, the alias "postmaster" is reserved (to prevent site maintainers from assuming that address). In order to set up an instance of the Email Archive tool to handle the postmaster address, you will need to manually remove the entry for the postmaster address from the sakai_alias table. You should then immediately add an instance of the Email Archive tool to a site of your choice (either the Admin Workspace or a dedicated site). Messages received for postmaster by James will then be viewable in the instance of the Email Archive tool you've set up. You should configure that instance of the Email Archive tool to accept messages from anyone.
Email Archive Tool Alias Naming Limitation
As noted above, Sakai includes a postmaster account for use by James. As a consequence, the alias "postmaster" is reserved and should never be used as an Email Archive Tool alias. Doing so will result in Sakai throwing a runtime error.
Configuring Sakai from within the Web Application
Once Sakai is up and running and you are familiar with the basic operation of the software, there are few common administrative tasks that you may wish to perform.
Change the Default Administrator's Password
By default, the application ships with an administrative user named "admin" whose password is also "admin". Once you get Sakai up and running, one of the most important configuration tasks is to change the default admin password. To do this:
- log in to Sakai using the username "admin", password "admin".
- Navigate to the "Administration Workspace" site, then open the "Users" tool.
- Click the "admin" user's name in the list of users
- Enter a new password, then click "Update Details"
Adding Administrative Users
If you wish to delegate administrative permissions to a range of users and wish a clearer audit trail for admin changes, you may want to set up additional administrator accounts. To add a new administrative user:
- Log in as an existing administrator
- Under the "Administration Workspace" site, open the "Users" tool.
- Click the "New User" link.
- Enter the new user's information and set their type to admin (mostly a nicety to help remember who the admins are)
- Click "Save Details"
- Open the "Worksite Setup" tool. Check the box next to the "Administration Workspace" site, then click "Edit".
- Click "Add Participants" then enter the username you created earlier in the "Username(s)" text area (the upper of the two). Click "Continue".
- Tick the radio button for the "admin" role, then click "Continue".
- Select your notification options if desired, then click "Continue".
- Click "Finish" to add the user to the Administration Workspace as an admin.
If you wish to give a user superadmin privileges without adding them to the Administrative Workspace site:
- Create a new user following the first 5 steps above.
- Under the "Administration Workspace" site, open the "Realms" tool.
- Enter "/site/!admin" in the search field and hit the "Search" link.
- Click the "/site/!admin" link that appears in the list of results.
- Click the "Grant Ability" link at the top of the screen that appears.
- Enter the id of the user created above in the "User Id:" text box, select the "admin" role, then click "Done".
Manually Adding a Tool to a Sakai Site.
By default, a number of provisional tools are included with Sakai, but can only be added to a site manually. This process is detailed in the SakaiPedia entry "Manually Adding a Tool to a Sakai Site".
Displaying dynamic HTML within the gateway and other sites.
By default, the gateway site displayed before users logged in displays a two-column layout containing the latest message of the day and the content of the location specified by server.info.url in your sakai.properties file. The default location for server.info.url points to a static HTML file bundled with a standar Sakai installation. Administrators are likely to prefer a message that can be updated without requiring a restart. Here's an approach to making the server info displayed in the gateway dynamic:
- Open the "Administration Workspace"
- Open the "Resources" tool
- Click on the "public" directory.
- Use the triangle to the right of the Add button to select the "Create HTML Page" option.
- Enter your content, then click "Continue.
- Select a name and copyright options for your page, then click "Finish".
- Once the page is saved, copy and paste the URL for your page into memory (the URL will typically be something like http://hostname/public/Your File Name.
- Edit your sakai.properties file and set server.info.url to the URL specified above (the protocol and port are optional).
- Restart Sakai
A similar approach can be used to prepare public content for use in any site or template. As above, create public content from the "Administration Workspace" site. Once you've saved your content, simply add an additional "Web Content" tool to the site in question. Here's an example in which we add a custom page to the default template for new "My Workspace" sites (useful for training materials, etc.):
- Follow the steps to create a dynamic page as in the previous examples.
- Open the "Sites" tool
- Open the "My Workspace" template (!user)
- Click the "Pages" button
- Click the "New Page" link
- Enter a name for your new page (this will appear in the list of pages in the navigation bar).
- Click the "Tools" button
- Click the "New Tool" link
- Select the radio button next to the "Web Content" tool
- Scroll down and enter the URL you copied above into the "source" field.
- Click "Done" to save your changes.
Template sites only show up in the "Sites" tool. For individual sites, you can simply add the dynamic content as follows:
- Follow the steps to create a dynamic page as in the previous examples.
- Open the site
- Open the "Site Info" tool
- Click the "Edit Tools" link
- Select the "Web Content" tool, then click "Continue"
- Enter the URL you copied above into the "URL" field, then click "Continue", then "Finish"
Permissions
The permission to view, edit, delete, and otherwise manage the data associated with Sakai tools is managed using realms, which are most commonly associated with a site. Each realm has one or more roles to which a user can be assigned. Permissions are managed using the Realms tool in the administrative workspace.
Examples of roles would be instructor, student, teaching assistant, grader, site maintainer, site accessor. A role is typically given a single word name like "instructor", "student", "ta", "grader", "maintain", "access". Each role specifies explicitly all of its permissions, and one set of permissions does not imply another (for example, "add" for a given tool does not imply "edit" or even "read" for the same tool).
The default permissions for a realm are inherited from the most appropriate realm template for a given site at the time the site is created. A site with a type of "project" would inherit from the realm !site.template.project realm if it exists, or from the !site.template realm if !site.template.project realm does not exist.
JVM Tuning
JVM tuning is an ever-evolving process that changes with each version of Java. Even for development instances, you'll need to read through and apply the basic JVM tuning suggestions below.
Basic JVM Tuning
The default JVM settings are not adequate to run Sakai. At a minimum, you need to increase the overall heap size and the maximum size allowed for the permanent generation. This can be done as follows.
Mac/Linux: Create the file TOMCAT_HOME/bin/setenv.sh containing a line like the following:
export JAVA_OPTS="-server -XX:+UseParallelGC -Xmx768m -XX:MaxPermSize=160m -Djava.awt.headless=true" |
Windows(PC): Create the file TOMCAT_HOME/bin/setenv.bat containing a line like the following:
set JAVA_OPTS=-server -XX:+UseParallelGC -Xmx768m -XX:MaxPermSize=160m -Djava.awt.headless=true |
Advanced JVM Tuning
For more information, please see:
Load Balancing and Scaling
Introduction
Although Sakai can be run on a single server which houses all database and filesystem content, many sites will want to consider growing their installation beyond the confines of a single server. This section of the admin guide will outline the basic approach to scaling up your sakai installation. When deciding which approach is best for you, you should consider the information below. Whatever solution you choose should be tested for performance and tuned as needed. For more information on tuning, see the Sakai Admin Guide - JVM Tuning and Sakai Admin Guide - Database Configuration and Tuning sections of the admin guide.
Standalone Server
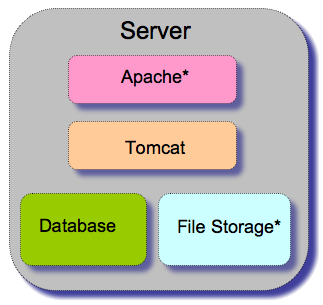
The simplest option is to run all components of Sakai on a single server. As indicated by the asterisks in the diagram, Apache and filesystem storage are optional components, as Sakai can run with Apache (using Tomcat to handle requests directly) and can be made to store binary content in the database.
This configuration entails installing a database server locally or using the default Hypersonic SQL implementation bundled with Sakai. This option offers the least benefits in terms of scalability and redundancy.
However, this configuration is highly portable, and can be set up on a reasonably powerful laptop. Thus it is ideally suited for a standalone development environment, which allows a developer to write and test tools and modules for Sakai without even a network connection. This is also a good option when demonstrating Sakai in environments without reliable networking.
Thin client configuration
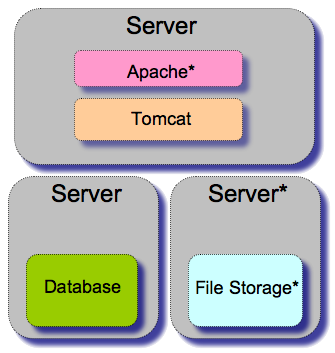
A "thin" client is simply a server which only runs the application component of Sakai, and which does not house any database or filesystem content. This solution allows institutions with existing database and distributed storage resources to take advantage of their existing infrastructure. It may be acceptable to run a limited demonstration or pilot with this configuration, but a load balanced solution is recommended for anything beyond that (see below).
Load balanced thin client
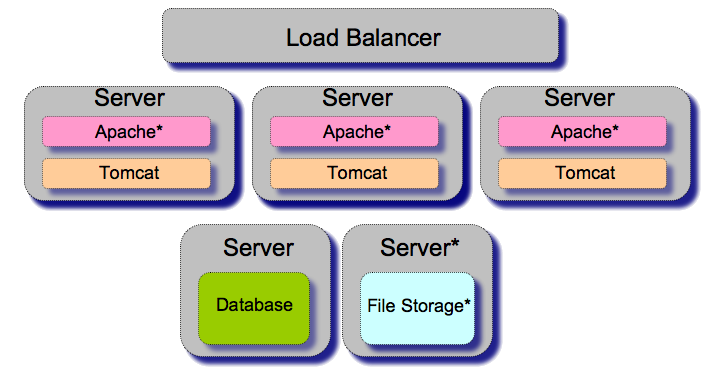
A load balanced collection of thin clients is one of the scalable options for Sakai. It offers load balancing to distribute large volumes of traffic. It also offers redundancy, which allows for the more seamless management of hardware failures and preventative maintenance. In this configuration, each application server is pictured as only running tomcat, which is the minimum required to run Sakai.
Thicker client
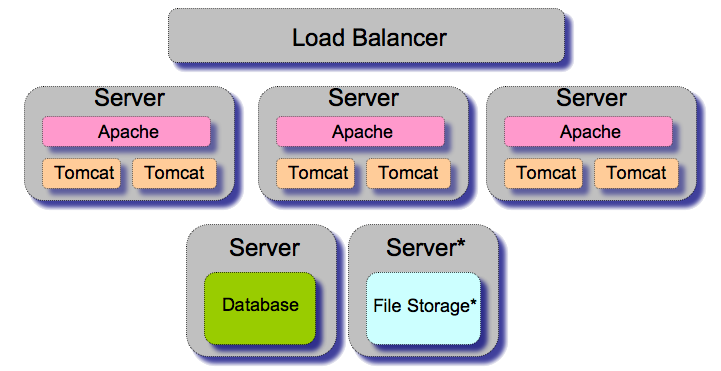
A "thicker" client is simply an application server that runs one or more tomcat instances behind an apache instance. Adding Apache allows you to take advantage of the configurability and maturity of Apache, and also to set up clients that contain more than one instance of tomcat. A key reason to consider this information is the hard limit of memory usage on 32-bit hardware. The 32-bit JVM is only capable of addressing around 2G of RAM, which is tight for a full Sakai installation. You can install multiple tomcats on a single application server, and thus take better advantage of the memory available.
Big Iron
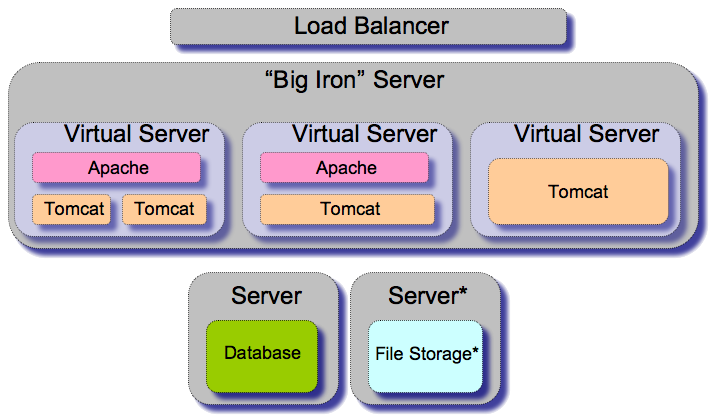
A number of sites have chosen to run with a smaller number of more powerful servers (as few as one), which are divided up into a series of virtual machines using solutions like VMWare. Although this may create a single point of failure for instances with only one large server, it offers the ability to dynamically allocate CPU and RAM among multiple virtual machines. It also has great advantages for change management, as a single node can be updated, tested, and then cloned into the appropriate number of updated application servers. Also, the state of a node can be saved for rolling back major changes if problems are detected later on.
Load Balancing Solutions
Sites running sakai in production have chosen to handle load balancing in a multitude of ways. These can roughly be divided into software solutions, which run on existing hardware, and hardware solutions, which run software on dedicated hardware, typically provided by a commercial vendor.
Software Solutions
The simplest software solution is to use an instance of Apache to balance traffic between multiple tomcat installations using mod_jk (apache 1.3 and 2.0) or mod_proxy_ajp (apache 2.2 and higher). Apache 2.2 or higher also offer the ability to use mod_proxy_balancer to balance multiple apache or tomcat installations. For more details on setting up tomcat with mod_proxy_ajp, see the Sakai Admin Guide - Advanced Tomcat (and Apache) Configuration section of the admin guide.
Hardware Solutions
There are a number of dedicated solutions provided by commercial vendors such as Big5 Networks and Zeus. Some solutions offer only the ability to load balance HTTP traffic (comparable to mod_proxy_balancer), while others offer the ability to use AJP (comparable to mod_jk or mod_proxy_ajp). Any solution that provides compatible sticky sessions (see below) should be capable of working with Sakai.
Sticky Sessions and Sakai
Whatever load balancing solution you choose, you must ensure that each client remains on the same app server for the life of their session. There are multiple approaches for monitoring and maintaining sticky sessions. Solutions that use IP-based sessions have problems with virtual private networks and proxies. Solutions that use dedicated cookies seem to work best for most people, but may cause problems with web services calls and some DAV clients. Whichever method you choose, be aware that the sticky session timeout is one of the factors controlling how long idle sessions remain active, as users will be required to log in again if they are sent to a different node after their sticky session times out.
Cluster Options in the sakai.properties File
Key portions of Sakai are designed to be cluster-aware. There are a handful of settings in the sakai.properties file that control the way in which clustering is managed.
Property | Description |
|---|---|
The time in seconds after which an inactive server will be expired from the cluster. | |
The percentage of maintenance passes to run the full de-ghosting / cleanup activities, including delisting stale server nodes. | |
How often (in seconds) a server should register that it is still alive. |
Clustering and auto.ddl
There have been problems reported lately with installations that enable the auto.ddl property on multiple nodes in a cluster. There are some suggestions that auto.ddl should only be used for the initial installation, and that updates should be managed using the migration scripts included with each release. Others choose to allow one node to start up with auto.ddl enabled, and to allow that node to create new tables, update existing tables, and create indexes.
Performance Testing
When testing and configuring for performance, you will be focusing on modifying one or more of the following:
- your tomcat JVM settings
- your tomcat configuration
- your apache configuration
- your database configuration
- operating system settings
- load balancer settings
- the number of application servers allocated
The basic methodology prior to moving into production is to simulate an appropriate amount of load, monitor performance, and tune components appropriately. Once you are in production, the basic methodology is to monitor performance and make incremental adjustments as needed.
There are a handful of commercial and free tools available for generating load. Of the commercial tools available, the most commonly used in the Sakai community are WebLoad and LoadRunner. Of the free tools available, the most commonly used is JMeter. For more information on using JMeter, please visit:
On a running production instance, you can find maxed out caches by logging in as an admin user, going to Administration Workspace -> Memory - Status and looking for maxed-out caches. A maxed-out cache will have a count value of 10000 or 100000.
All caches should be adjustable in Sakai 10.0+ with a simple modification to sakai.properties.
Adjust the caching of users especially if you use the JLDAP provider. This example will cache up to 50k users for up to half a day each:
memory.org.sakaiproject.user.api.UserDirectoryService.callCache=timeToLiveSeconds=43400,timeToIdleSeconds=0,maxElementsInMemory=50000
Adjust the realm/role group cache to retain items in the cache for two hours:
memory.org.sakaiproject.authz.impl.DbAuthzGroupService.realmRoleGroupCache=timeToLiveSeconds=7200,maxElementsInMemory=0
The user/site cache keeps track of the sites associated with the user:
memory.org.sakaiproject.site.api.SiteService.userSiteCache=timeToLiveSeconds=86400,timeToIdleSeconds=0
The security service cache retains information about permission requests (e.g., can user xxxx do asn.submit in /site/abc):
memory.org.sakaiproject.authz.api.SecurityService.cache=timeToLiveSeconds=86400,timeToIdleSeconds=0
Advanced Tomcat Configuration
Tomcat as configured out of the box is adequate for development and very basic exploration of Sakai. If you want to move beyond this point, you will need to satisfy a few additional concerns, namely handling SSL and scaling beyond a single server.
Redirecting Traffic to the Portal
The default root context for tomcat provides documentation for tomcat itself when users visit the root of your site. When running Sakai in production, you should redirect traffic to your portal of choice by removing or renaming the existing content in TOMCAT/webapps/ROOT and replacing it with an index.html file with contents like:
<html><head><title>Redirecting to /portal</title><meta http-equiv="Refresh" content="0:URL=/portal"></head><body bgcolor="#ffffff" onLoad="javascript:window.location='/portal';"><div style="margin:18px;width:288px;background-color:#cccc99;padding:18px;border:thin solid #666600;text-align:justify"><p style="margin-top:0px">You are being redirected to the Sakai portal. If you are not automatically redirected, use the link below to continue:<br/><a href="/portal">Take me to the Sakai portal</a></p></body></html> |
Configuring tomcat to handle SSL
SSL can be handled by tomcat itself, by putting tomcat behind an apache front end, or by putting tomcat (with or without apache) behind a dedicated load balancer. Tomcat standalone can either handle SSL natively, or can now be configured to use the tomcat-native jars and APR libraries to handle http and https.
Configuring tomcat to handle SSL natively
If you want to expose your Sakai installation to end users, you will need to set up SSL support using a certificate signed either by a local or external certificate authority. If you do not already have a certificate, you can create a self-signed certificate by running the following command as the user that will run sakai:
keytool -genkey -alias tomcat -keyalg RSA |
If you need to obtain and install a certificate signed by a trusted authority, review the tomcat documentation here:
http://tomcat.apache.org/tomcat-5.0-doc/ssl-howto.html
You can also take an existing X509 certificate and private key and import them into a keystore using the following utility:
http://www.comu.de/docs/tomcat_ssl.htm
Once you have a .keystore file in your service user's root directory, you will need to uncomment the SSL connector in your tomcat's server.xml file:
<Connector port="8443" maxHttpHeaderSize="8192" maxThreads="150" minSpareThreads="25" maxSpareThreads="75" enableLookups="false" disableUploadTimeout="true" acceptCount="100" scheme="https" secure="true" clientAuth="false" sslProtocol="TLS" /> |
Configuring tomcat to use APR
If you take the time to install APR and the tomcat native libraries, tomcat can be made to work with an X509 certificate in PEM format without conversion. Those instructions can be found at:
http://tomcat.apache.org/tomcat-5.5-doc/apr.html
Configuring tomcat to force SSL for appropriate content
At a minimum, any components (login, xlogin) that transmit username and password information should be transmitted using SSL. To avoid problems with session cookie hijacking, it is recommended that an entire Sakai installation be secured with security being relaxed only as needed.
Securing Individual Tomcat Contexts
To secure an individual tomcat context, you must edit its WEB-INF/web.xml and add the following inside the <web-app> tags:
<!-- redirect all traffic to the SSL port --><security-constraint> <web-resource-collection> <web-resource-name>Automatic SLL Forwarding</web-resource-name> <url-pattern>/*</url-pattern> </web-resource-collection> <user-data-constraint> <transport-guarantee>CONFIDENTIAL</transport-guarantee> </user-data-constraint></security-constraint> |
At a minimum, you should secure The ROOT and login contexts.
Securing All Tomcat Contexts
If you wish to secure the entire tomcat installation (which can be done regardless of how you provide SSL), add the following to TOMCAT_HOME/conf/web.xml inside the web-app tags:
<!-- redirect all traffic to the SSL port --><security-constraint> <web-resource-collection> <web-resource-name>Automatic SLL Forwarding</web-resource-name> <url-pattern>/*</url-pattern> </web-resource-collection> <user-data-constraint> <transport-guarantee>CONFIDENTIAL</transport-guarantee> </user-data-constraint></security-constraint> |
DAV issues when requiring SSL site-wide
When using the above configuration to require SSL for your entire tomcat installation, you must ensure that the serverURL specified in your sakai.properties file specifies the https protocol, including the port if the port is not 443. If you fail to do this, the DAV functionality built into to Sakai may not function properly. (You'll also be requiring users to suffer through a redirect for most if not all URLs they follow within your Sakai installation.)
Relaxing Security Restrictions for a Single Context
If you have content that is required to be transmitted using http (for example, a tool that exports subscribable iCal calendars), you may want to relax the overall security restriction for a single context. This can be done by adding the following to a context's WEB-INF/web.xml file:
<security-constraint> <web-resource-collection> <web-resource-name>SSL Requirement Disabled</web-resource-name> <url-pattern>/*</url-pattern> </web-resource-collection> <user-data-constraint> <transport-guarantee>NONE</transport-guarantee> </user-data-constraint></security-constraint> |
This will only ensure that SSL is not required. You can still of course use SSL to communicate with this context.
Configuring Apache to proxy connections to tomcat
The following instructions will describe the basic options for setting up tomcat behind apache 2.2. NGinx and other frontends also work great, and their configuration is similar. Apache offers two main methods to proxy connections to tomcat: mod_proxy and mod_proxy_ajp.
Configuring mod_proxy
mod_proxy proxies connections to tomcat using plain http or https. The following configuration directives in your apache server's httpd.conf will map all contexts from a stock tomcat installation running on port 8080 to the root of the apache install:
#On some servers (like Ubuntu) you have to enable mod_proxy and mod_rewrite (a2enmod)ProxyPass / http://localhost:8080/ProxyPassReverse / http://localhost:8080/#Requires that header module be enabled (sudo a2enmod headers)RequestHeader set X-Forwarded-Proto "https" ProxyRequests OffProxyPreserveHost On<Proxy *> Order deny,allow Allow from all</Proxy>#Redirects portalRewriteEngine on#RewriteRule ^/$ /portal/ [L,R]#This rewrite rule is probably betterReWriteCond %{SERVER_PORT} !^443$RewriteRule ^/(.*) https://%{HTTP_HOST}/$1 [NC,R,L] |
If you are proxying an SSL connection to an SSL connection or a non-SSL connection to a non-SSL connection, you will need to reconfigure tomcat's connectors so that they are aware of the ports that end users are using. Otherwise the URLs tomcat constructs internally will reflect the wrong port numbers. This is accomplished by modifying the connectors defined in TOMCAT_HOME/conf/server.xml along these lines:
<Connector port="8080" maxHttpHeaderSize="8192" maxThreads="150" minSpareThreads="25" maxSpareThreads="75" enableLookups="false" redirectPort="443" acceptCount="100" connectionTimeout="20000" disableUploadTimeout="true" proxyName="{YOUR SERVICE NAME}" proxyPort="80"/><Connector port="8443" maxHttpHeaderSize="8192" maxThreads="150" minSpareThreads="25" maxSpareThreads="75" enableLookups="false" disableUploadTimeout="true" acceptCount="100" scheme="https" secure="true" clientAuth="false" sslProtocol="TLS" proxyName="{YOUR SERVICE NAME}" proxyPort="443"/> |
Additionally, because of recent browser updates with enhanced Mixed Content protection you *may* need to add a valve to Tomcat to allow it to know about the forwarded protocol. In the Engine block for localhost you'd want to add this block. This would match the request header you're passing in Apache/Nginx.
<Engine name="Catalina" defaultHost="localhost">. . . <Valve className="org.apache.catalina.valves.RemoteIpValve" protocolHeader="X-Forwarded-Proto" />. . .</Engine> |
For older Sakai instances running tomcat 5.5 (2.8) you have to get the jar from https://code.google.com/p/xebia-france/wiki/RemoteIpValve. Then put this jar in server/lib and use the className: org.apache.catalina.connector.RemoteIpValve
The direct location to the jar (since it's kind of buried in the page) is http://xebia-france.googlecode.com/files/xebia-tomcat-extras-tc55-1.0.0.jar
The key changes are updating the redirectPort for non-SSL ports, and adding the ProxyName and ProxyPort attributes. Note that this must be done for each active connector that is being mapped using mod_proxy.
If you use mod_proxy to proxy an SSL connection to a non-SSL tomcat connector (such as the one that runs on port 8080 by default), you will need to add the force.url.secure parameter to your sakai.properties file, typically with a value like:
force.url.secure=443 |
Configuring mod_proxy_ajp
AJP, or the The Apache Jserv protocol is the protocol by which tomcat and some other proxying service (Apache or a dedicated hardware load balancer) communicate. If you intend to use apache to provide other static content or to handle SSL, you may want to configure Tomcat to listen for AJP requests, and the have Apache proxy requests for tomcat using AJP rather than HTTP or HTTPS. To do this, you will need to do the following:
enable the AJP connector for one or more tomcat installations by editing TOMCAT_HOME/conf/server.xml and uncommenting the AJP connector included with the default distribution and adding the correct URIEncoding:
<Connector enableLookups="false"port="8009"protocol="AJP/1.3"redirectPort="8443"URIEncoding="UTF-8"/>If you are load balancing multiple tomcat instances on the same server, you will need to ensure that each one listens for AJP requests on a different IP address and/or port.
You can load balance requests between tomcat instances by adding something like the following to your Apache httpd.conf:
ProxyPass / balancer://sakaiCluster/ stickysession=JSESSIONID nofailover=On<Proxy balancer://sakaiCluster>BalancerMember ajp://localhost:8009BalancerMember ajp://localhost:8019BalancerMember ajp://localhost:8029</Proxy>You must have mod_proxy, mod_proxy_ajp, and mod_balancer enabled to use the above configuration options. It has also been noted that versions of mod_proxy_balancer prior to 2.2.4 have errors with this configuration.
Configuring mod_jk
mod_jk is an earlier (and still supported) apache module that supports proxying connections via AJP. mod_jk is available from tomcat.apache.org:
http://tomcat.apache.org/download-connectors.cgi
Once you have mod_jk installed, the simplest and most widely supported method of configuring mod_jk is to add directives like the following to your httpd.conf file:
# Set the location of the worker.properties fileJkWorkersFile /etc/apache2/worker.properties# mount the root and all subdirectories associated with our Sakai installationJkMount /* sakaiWorker |
You will then need to create a worker.properties file at the location specified in your httpd.conf which contains lines like the following:
# We only have one worker, so this is a short list.worker.list=sakaiWorker# The minimum properties for the sakaiWorker are set hereworker.sakaiWorker.type=ajp13worker.sakaiWorker.host=localhostworker.sakaiWorker.port=8009 |
For more information on configuring mod_jk (including examples that demonstrate using mod_jk to load balance between multiple tomcat instances), consult the Tomcat connector documentation.
Configuring Apache to Use Compression
If you are proxying connections to Tomcat through Apache, you may wish to look at enabling and configuring compression in Apache. This will allow Apache to greatly reduce the size of generated content prior to delivery to end users. This appeals particularly to sites whose users download content over dial-up or otherwise bandwidth-limited connections. Below are sample settings to be placed in httpd.conf (thanks to Stephen Marquard for those):
# mod_deflate (compress output for browsers that support it)AddOutputFilterByType DEFLATE text/html text/plain text/xml text/css application/x-javascript text/javascript text/x-js application/json application/xml application/javascript# Some adjustments for IE browsers (c/fBrowserMatch ^Mozilla/4 gzip-only-text/htmlBrowserMatch ^Mozilla/4\.0[678] no-gzipBrowserMatch \bMSIE\s7 !no-gzip !gzip-only-text/htmlBrowserMatch \bMSIE\s8 !no-gzip !gzip-only-text/html |
Some sites have experienced problems using compression with Apache 2.0. Apache 2.2 or higher is recommended when using compression.
Configuring Tomcat Standalone to Work with a Load Balancer
If you have a software or hardware load balancer (see the Sakai Admin Guide - Load Balancing and Scaling section of the admin guide for more information), you can typically configure it to remap all traffic for the normal http and https ports associated with your service address to one or more instances of sakai. The steps for doing so will vary according to your load balancing solution, consult your load balancer's documentation for more information.
As above, if you proxy an SSL connection to Sakai to a non-SSL connector, you will need to add the force.url.secure parameter to your sakai.properties file, typically with a value like:
force.url.secure=443 |
References
For more information, visit the following pages:
http://httpd.apache.org/docs/2.2/mod/mod_proxy.html
http://tomcat.apache.org/tomcat-5.5-doc/config/ajp.html
http://tomcat.apache.org/tomcat-3.3-doc/AJPv13.html
http://edocs.bea.com/wls/docs61/webapp/web_xml.html
Advanced Configuration Topics
This document covers advanced topics that may be of use in supporting and growing your Sakai installation.
Web Services
For information about Sakai's web services implementation, please visit:
- Web Services Documentation
- Home
- Assessment Web Services
- Announcement Web Services
- Content Hosting Web Services
- Web Services with Apache Axis
- CHS Web Services
For a good body of working examples, take a look at the Web services scripts available in the contrib space:
- https://source.sakaiproject.org/contrib/sakaiscript/webservices/examples
- https://source.sakaiproject.org/contrib/sakaiscript/clientexamples/
Quartz Scheduler
User Directory, Authentication, and Authorization Providers
A number of institutions have created providers to allow a Sakai install to authenticate and authorize users based on the contents of an external service. This section provides links to some of the documentation for the most commonly supported Auth/Auth mechanisms.
General
LDAP
- The Enterprise Working Group's LDAP Page
- The SakaiPedia Ldap Integration Page
- The Standford KerberosLdap provider
- A Presentation Regarding Integrating Sakai with LDAP that David Ross presented in Vancounter
CAS
- Steve Swinsburg's notes on CAS Integration?
- Enterprise Working Group CAS Integration Page (older)
Shibboleth
SakaiPortalLogin Web Service
The SakaiPortalLogin Web service is used to allow a user who has been authenticated in a trusted external system (in most cases this would be a portal) to get into Sakai without having to log in again. Sometimes described as Single Sign On (SSO) this allows a user to move seamlessly from an external system into Sakai without having to login twice. To set this up use the following procedure:
1) Enable Sakai Web Services by adding the following entry to sakai.properties (by default Sakai Web Services are disabled):
- Indicates whether or not we allow web-service logins
webservices.allowlogin=true
1) Add the following entry in your sakai.properties file:
webservice.portalsecret = somePassword
This portalsecret is shared by Sakai and your trusted external system. When the trusted external system passes it to Sakai, Sakai knows that the Web service request is coming from a trusted server.
2) In your trusted external system (e.g. your portal) code a SakaiPortalLogin Web service to communicate with Sakai after the user has authenticated into the external system. Here is an example written in Coldfusion:
<cfinvoke webservice="http://#request.SakaiURL#/sakai-axis/SakaiPortalLogin.jws?wsdl" method="login" returnVariable="returnCode">
<cfinvokeargument name="id" value="the_User's_unique_identifier_in_Sakai"/>
<cfinvokeargument name="pw" value="the_portalSecret"/>
</cfinvoke>
If Sakai accepts the user's id and the portalsecret passed by the SakaiPortalLogin it will return a session (in the above Coldfusion example that session is contained in the variable "returnCode").
3) Add the following link to a Web page in the external system:
<a href=http://#request.SakaiURL#/portal?sakai.session=#returnCode#' >SSO to Sakai</a>
Modify the above link so that the sakai.session parameter contains the session returned by your SakaiPortalLogin Web service.
When the user clicks on the above link they get into Sakai through single-sign-on (SSO)!
Note 1: SakaiPortalLogin requires Sakai to have accounts that are identified using an identifier that matches the id passed by the SakaiPortalLogin Web service. You can pre-load these accounts using Sakai Web services or you can add them on the fly using Web services.
Note 2: Make sure your trusted external system and Sakai communicate in ways that can't be overheard – otherwise somebody might be able to figure out what the portalSecret is.
Note 3: If you want Sakai users to exclusively navigate (and authenticate) into Sakai through the external portal you can configure Sakai so that the top login on Sakai links to the external system. To do this set the following parameters in sakai.properties:
top.login=false
login.text=Login
login.url=url_of_external_system/portal
Admins can still log into Sakai directly by going to
http://yourCollegesSakaiURL/portal/xlogin
Course Management Integration
http://confluence.sakaiproject.org/confluence/display/ENTR/Course+Management+Integration
Verifying and Troubleshooting Your Sakai Installation
Verifying Your Installation
Whether you are performing your first install of Sakai or upgrading to a newer revision, it is advisable to test the functionality you care about after each round of configuration changes.
A good source of information for running a Sakai installation through its paces are the test scripts coming out of the QA Working Group. In all likelihood, you will want to test a subset of the functionality covered by the test scripts according to the tools and use cases at your site.
When you develop your local test protocol, you will want to exercise the full range of options in each of the tools you plan to support. This will help uncover configuration issues local to your institutions. It may also help you build familiarity with known bugs and workarounds with your version of Sakai.
In addition to having your test users record problems that occur using a methodology like the critical incident technique, you should pay close attention to messages that appear in the tomcat system log (usually TOMCAT_HOME/logs/catalina.out).
Once you have verified functionality, go through the Sakai Admin Guide - Load Balancing and Scaling and Sakai Admin Guide - JVM Tuning sections of the admin guide for information on making sure your instance is configured to perform reliably under load.
Automated Verification of Your Installation
Some groups have had positive experiences using Selenium to perform automated tests on a Sakai installation. For more information, see one of the following links:
Troubleshooting Your Installation
When you encounter an unexpected behavior with your Sakai installation, there are a handful of sources of information that can help you diagnose the problem:
- Any onscreen messages
- Your tomcat logs (usually TOMCAT_HOME/catalina.out)
- Any component logs (such as that generated by James)
- The SakaiPedia and other Sakai Confluence pages
- The Sakai JIRA bug database
- Searching the archives of tool-specific mailing lists (such as OSP)
- Searching the sakai-dev gmane archives (for general problems)
If there are no stack traces or error messages, you may find it useful to increase the verbosity of logging. The log levels in Sakai can be changed by adding log.config directives to your sakai.properties file as specified here:
http://confluence.sakaiproject.org/confluence/display/BOOT/Controlling+logging+from+sakai.properties
If you reach the point where you have searched other sources of infomration and are asking the sakai-dev list for help, please make sure you provide:
- Minimal details about your installation (Platform, OS, Sakai version, Java version, Tomcat version)
- A description of the problem behavior and the steps required to reproduce
- The text of any on-screen error messages you received
- The text of the stack trace(s) recorded in your log files.
If you are able to verify that the problem is not an existing open bug and that it's not a local configuration problem, best practice is to report the bug using JIRA.
Operations Best Practices
Introduction
This section is intended to bring together a handful of best practices not covered elsewhere in the admin guide. These are not canonical, but represent the range of techniques production sites use to manage the uptime and performance of their sakai installations.
Maintenance Schedules
Although continuous availability is the ultimate goal, many sites find it useful to announce routine daily and/or weekly maintenance times to ensure that routine maintenance can be performed in an orderly fashion. A basic approach is to schedule a short daily window, and a longer window that occurs once a week. The daily maintenance window is scheduled for 15-30 minutes each day, which can be used for minor updates, restarts, log rotation, et cetera. The weekly maintenance window typically occurs on the slowest day of the week, and is long enough to allow for patches, cold database backups, version updates, hardware migrations, etc. Both the daily and weekly window should either be based on clearly observed usage patterns among your users, or on the scheduled down time of systems on which your installation depends (database, distributed storage), et cetera.
Your downtime schedule should be clearly advertised on both the gateway site (which users see before logging in) and in each user's "My Workspace" site.
This is critical to establishing the expectation among end users that the system will be unavailable during scheduled maintenance times.
Another useful feature is to set up a separate apache installation that is the failover node for your load balanced cluster. This apache instance should present a page that reminds users of the published maintenance schedule, and also serves as a notification mechanism in explaining unexpected outages.
Hot Deployment of Changes
If you have a load balanced installation of Sakai, application changes can be hot deployed, although there are caveats. If you wish to take an application server out of the load balanced pool and then take it down, you must keep in mind the sticky session timeout for your sakai installation, and must carefully monitor the sticky sessions assigned to a node before shutting it down. Here's an example methodology for hot deployment of changes:
- remove the node from the load balanced pool while continuing to allow current active connections
- monitor sticky sessions until all users are off of the node
- take down the node
- patch or otherwise update the node
- bring the node up and test individually
- return the node to the load balanced pool
- continue the process with the next node
If your session timeout is longer than an hour, you can imagine that it may take some time to ensure that all traffic is off of a node before restarting. If you choose to shorten the process by shutting down the node once the load falls below a certain threshhold, keep in mind that any users who remain connected to a node when it shuts down may lose their work in progress, including assessments. This is another benefit of clearly advertising your downtime schedule, it gives you a safer time in which to introduce changes.
Automated Deployment
If you are deploying Sakai with local customizations and configuration changes (as most sites do), you may find a benefit in creating an automated deployment process. This process would do something like:
- download the base version of Sakai from subversion
- overlay any local tools and code changes
- test the build and notify an administrator if there are failures
- stop Sakai
- deploy the updated build
- restart Sakai
The downloading and overlaying of code can be managed to a large extent by establishing your own subversion repository and using the svn:externals functionality to create a combined source directory. For more information on svn:externals, see:
An example of an automated build process was detailed in David Haines' talk at the 5th Sakai Conference in Atlanta:
http://bugs.sakaiproject.org/confluence/display/CONF06/The+University+of+Michigan+Build+Process
Security
Security updates are not publicly announced until there has been enough time for existing installations to address the problem. All security notifications are coordinated through Unknown User (arwhyte). For more information, see the "Sakai Admin Guide - Joining the Community" section of this document or the "Documenting your Sakai instance as part of the Sakai community" section of the SakaiPedia.
Patches
You may find that your version of Sakai suffers from a known bug for which there is a patch. Applying a patch to a sakai installation requires a source build and the standard patch utility. The steps are typically as follows:
- Obtain the patch or updated source
- Shut down your sakai installation
- Remove any old versions of the affected project from $CATALINA_HOME/shared/lib, $CATALINA_HOME/components and $CATALINA_HOME/webapps.
undeploy the affected component using the Sakai plugin for Maven ("maven sakai:undeploy" from the component's source directory). - build and deploy the affected components using the Sakai plugin for Maven ("maven sakai" from the component's source directory).
- start your sakai installation
Monitoring
Many institutions choose to use programs like Nagios and Big Brother to monitor the health of their Sakai installation and notify key staff. These programs typically verify that all processes are running, and that Sakai is listening on the desired ports. There are also scripts to monitor the contents returned by a web request. One approach is to have a simple tool installed within Sakai that's accessible without a password return a summary of the status of the internal health of a Sakai install (database connections, memory, etc.).
If you are running in a load balanced installation, your load balancer may also offer tools to monitor the health of a node and either reduce the amount of load directed to the node over time, or flag the node as unavailable and redirect all traffic from that node. Where possible, you should tie your load balancer's monitoring to something that reflects the internal health of Sakai rather than whether it is simply up and perhaps not responsive. One suggestion would be to use a internal health check script as mentioned above and tie the load balancer to that. Another would be to test the response time of a node and flag it as down if it responds too slowly.
Notification
A key practice of any monitoring system is to quickly notify staff who can attend to the problem. Some institutions use a rotating on-call system where one staff member responds to all alerts during a given time period. Some institutions use a system in which the first person to respond to the problem indicates to everyone else that they are working on the problem. Some institutions with dedicated operators use a call tree that begins with first responders and continues through the organization.
Proactive review
It's also good practice to review the errors recorded in catalina.out regularly and compare to known bugs to help isolate configuration changes or previously unseen bugs. This is important as an ongoing activity, and as a part of quality assurance and change management.
Joining the Community
Whether you are running Sakai at a small scale or large scale, it is important to become an active part of the community. Community engagement expands your portfolio of best practices, it provides a forum for affecting change, and the Sakai community and product both benefit from a broad base of input. This section details a few community resources that are available and may be of help to you in supporting your Sakai installation.
Confluence
http://confluence.sakaiproject.org/
Confluence is the wiki used to document the Sakai product itself as well as the business processes related to the larger community. You can view materials without an account, but if you want to ccomment on , edit, or create your own new content, then you need an account. You can request an account by emailing sakai-core@apereo.org.
JIRA
http://jira.sakaiproject.org/
JIRA is the bug, requirements, and task tracking system used to manage the efforts of the Sakai community. You can browse JIRA without an account, but if you want to report new issues or comment on existing issues you'll need to create an account.
Key work groups and discussion groups
Sakai Community members are also very active in the Apereo Teaching & Learning interest group
Archives
Archives from the old email lists are at http://collab.archives.sakaiproject.org/
Sakai Coordinator
To contact the Sakai Community Coordinator email sakaicoordinator@apereo.org .
To subscribe or unsubscribe to email groups
Send an email to the relevant email address by adding "+subscribe" or "+unsubscribe" to the email address. For example, sending an email to sakai-dev+subscribe@apereo.org will subscribe you to the sakai-dev@apereo.org email list.
Google App Institutions
- If you are part of an institution that uses Google Apps, and your institutional settings do not allow you to post via the web forum, you should be able to send email to the list, just not post via the web.
- In some cases, your institutional settings may not allow you to subscribe using the email method nor using the web. In this case, please email the list owner to subscribe using the formula (list)+owner@apereo.org. For example, email apereoTL+owner@apereo.org and ask to subscribe.
Archives
Archives of the old Collab lists are available.
Calendar of Activities
Sakai Calendar - HTML
https://calendar.google.com/calendar/embed?src=apereo.org_qchv2i6q1v1e045h5j7irf4b7c%40group.calendar.google.com&ctz=America/New_York
Sakai Calendar - iCal subscription
Slack
https://apereo.slack.com/signup
If you can't find your "at institution.edu" on the Apereo signup page then send an email requesting access for yourself and your institution either to sakai-qa-planners@apereo.org or sakaicoordinator@apereo.org .
We currently have Slack groups for Sakai developers, Sakai Morpheus (responsive design), Sakai QA and for Apereo we have Tsugi , Release engineering, uPortal, UX .
Apereo Conferences
The Apereo conferences are another good source of up-to-the-minute information about current versions of sakai, upcoming releases, and are a great way to build a network of contacts that are dealing with many of the same support issues. For details about the next upcoming conference, visit http://conference.apereo.org.
Presentations and podcasts from previous conferences are retained for the use of the community.
Documenting your installation
As you move forward in supporting and learning about Sakai, it is important to learn about other administrators and their experiences in supporting Sakai. One way to do this is by registering your installation with the Sakai community.
For more information contact the Sakai Community coordinator.